DIY

Cricut Projects – Cards, Vinyl and Beyond

by

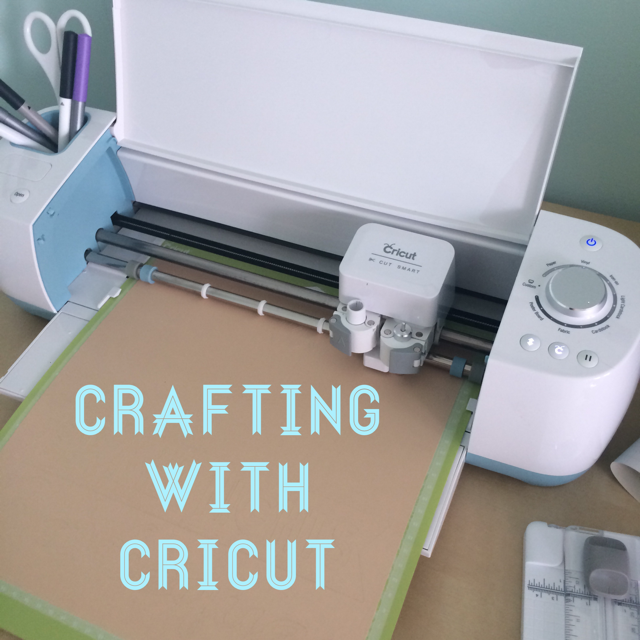
I love my die cut machine. I’m always trying to figure out a new use for it, like almost every day I think to myself what else can I cut. It may be a slight obsession, but in all seriousness, there is so much this machine can do! In the short time, I’ve had my Cricut Explore Air, I feel like I’ve doubled my craft production. It has been the key to my crafting projects and honestly has saved me money from things I would have gone to Etsy to purchase. If you are a DIYer or a crafter, get a Cricut and get crafting!

**This post contains affiliate links. If you purchase after clicking on one of these links we will be compensated. All opinions are my own.**


Crafting with Cricut - Cards, Vinyl and Beyond

I don’t own a Silhouette and have not tried to use one. I cannot attest to how well they work, but in my small amount of knowledge about them, (more…)

Posted in Cricut Projects, DIY | Comments Off on Cricut Projects – Cards, Vinyl and Beyond

Star Wars RunDisney Outfit

by

I recently ran the Star Wars 5K at Walt Disney World. One of the best parts of running Disney is all the crazy outfits people wear. After I signed up, I immediately wanted to have a fun outfit. Originally, I was going to make a crazy costume. That idea was over quickly once I remembered I had to be able to run in it. I decided on something I could actually use again and something that was easy to run in.

There are so many Star Wars RunDisney Outfits you can buy on esty, but why not just make one! It’s cheap, easy and you can add your own flare. The tank I made for the 5k said May The Course Be With You in yellow neon glitter letter. Here are instructions on how to make your own tank. ** This post contains affiliate links to products I use for your convenience and to support the continuance of this site. All opinions expressed are my own.

click here to read my review of the race

Star Wars Run Disney Outfit - DIY May The Course Be With You, The Pike's Place


Supplies:

  • Tank Top – Black cotton tank from Target ($8.00)
  • Glitter Heat Transfer Vinyl – Neon Yellow from Expressions Vinyl ($3.49 plus shipping) 
  • Iron
  • Cricut or Die Cut Machine
  • Font of your Choice – Star Jedi font from dafonts.com (for personal use only!)


(more…)

DIY Monogrammed File Folder

by

Monogrammed File Holder - DIY with Vinyl using a Cricut Explore

Sometimes I think everything in life should be personalized and after I got a Cricut, I had to test out making my own monogram. I have this file folder I purchased at Target that I use to store extra paper, vinyl, iron on material and other scraps and it needed some personalization to help cover up a weird spot the price tag left. So, I decided to test out my monogram making skills and make my first Cricut vinyl project. 

This post contains affiliate links to products I use for your convenience and to support the continuance of this site. All opinions expressed are my own. 

 
(more…)

Cricut Thank You Card

by

Cricut Thank You Card - DIY with a Cricut Explore

I recently purchased a new cricut machine to take my DIY projects to the next level. While card crafting is not impossible to do without a die cut machine, the new cricut design space makes it extremely easy to make cards and envelope fast. There are hundreds of designs, some at little to no cost on the design space. This tutorial is the second card I make with my cricut and it turned out very cute. This card showcases three things that a cricut can do cut, score and write.If you don’t have a die cut machine you may want to skip this tutorial. **This post may contain affiliate links. (more…)

A Simple Spring Wreath

by

Finally, winter is fading away and blossoms are starting to show up around our house. I love spring and with the change of seasons it’s always a great time to make a new wreath. Today I’m going to show you how to make an easy spring wreath to spruce up any door!

**This post contains affiliate links. If you make a purchase after clicking on these links we will be compensated. All opinions are our own.**

DIY home decor and more - A Simple Spring Wreath

Supplies:

You can buy these supplies at any craft store. I purchased my raffia wreath on sale for $4.00 and the fake tulips for $1.99 at JoAnns. In total my wreath cost a little over $6 with tax. (wire cutters I borrowed from my husband’s tool kit and I already owned the wreath hanger)

Shop Crafting Supplies at Joann.com

Instructions:

  1. Cut the bottom off the tulips with wire cutters to make each flower its own individual piece
  2. Insert each tulip into the raffia wreath in any pattern around the wreath. I tried to mix up the colors and spread them out. No glue needed!
  3. Once you like the way the tulips are placed, you are done.
  4. Hang it up and enjoy your pretty door!


You can design this wreath any way you like, add more tulips, different types of flowers and take then out and redo them if it doesn’t turn out the way you like the first time.

My wreath has been up for 2 weeks and not a single tulip has fallen out. The reason I didn’t glue it in place was so I can take the tulips off and make a different wreath for summer. If you want to reuse this wreath year after year, take a hot glue gun and glue each flower in place.


Posted in DIY | Comments Off on A Simple Spring Wreath

1 2 3

By continuing to use the site, you agree to the use of cookies. more information

The cookie settings on this website are set to "allow cookies" to give you the best browsing experience possible. If you continue to use this website without changing your cookie settings or you click "Accept" below then you are consenting to this.

Close